Cooking with ancient grains is a pretty fun way to add flavor, texture, and nutrition to meals. If you’re just starting, I know how it can feel a bit confusing with so many types of grains and unfamiliar names popping up at the store. I’m going to share what I’ve learned about working with ancient grains, from picking the right kinds to prepping and cooking them so you end up with tasty results, even if you’re brand new to the kitchen scene.

What Are Ancient Grains?
Ancient grains are varieties of grains and seeds that people have been eating for thousands of years. Unlike modern wheat or corn, most ancient grains haven’t been heavily modified or bred for large-scale agriculture. This means you often get bold flavors, more texture, and sometimes extra nutrients compared to regular grains.
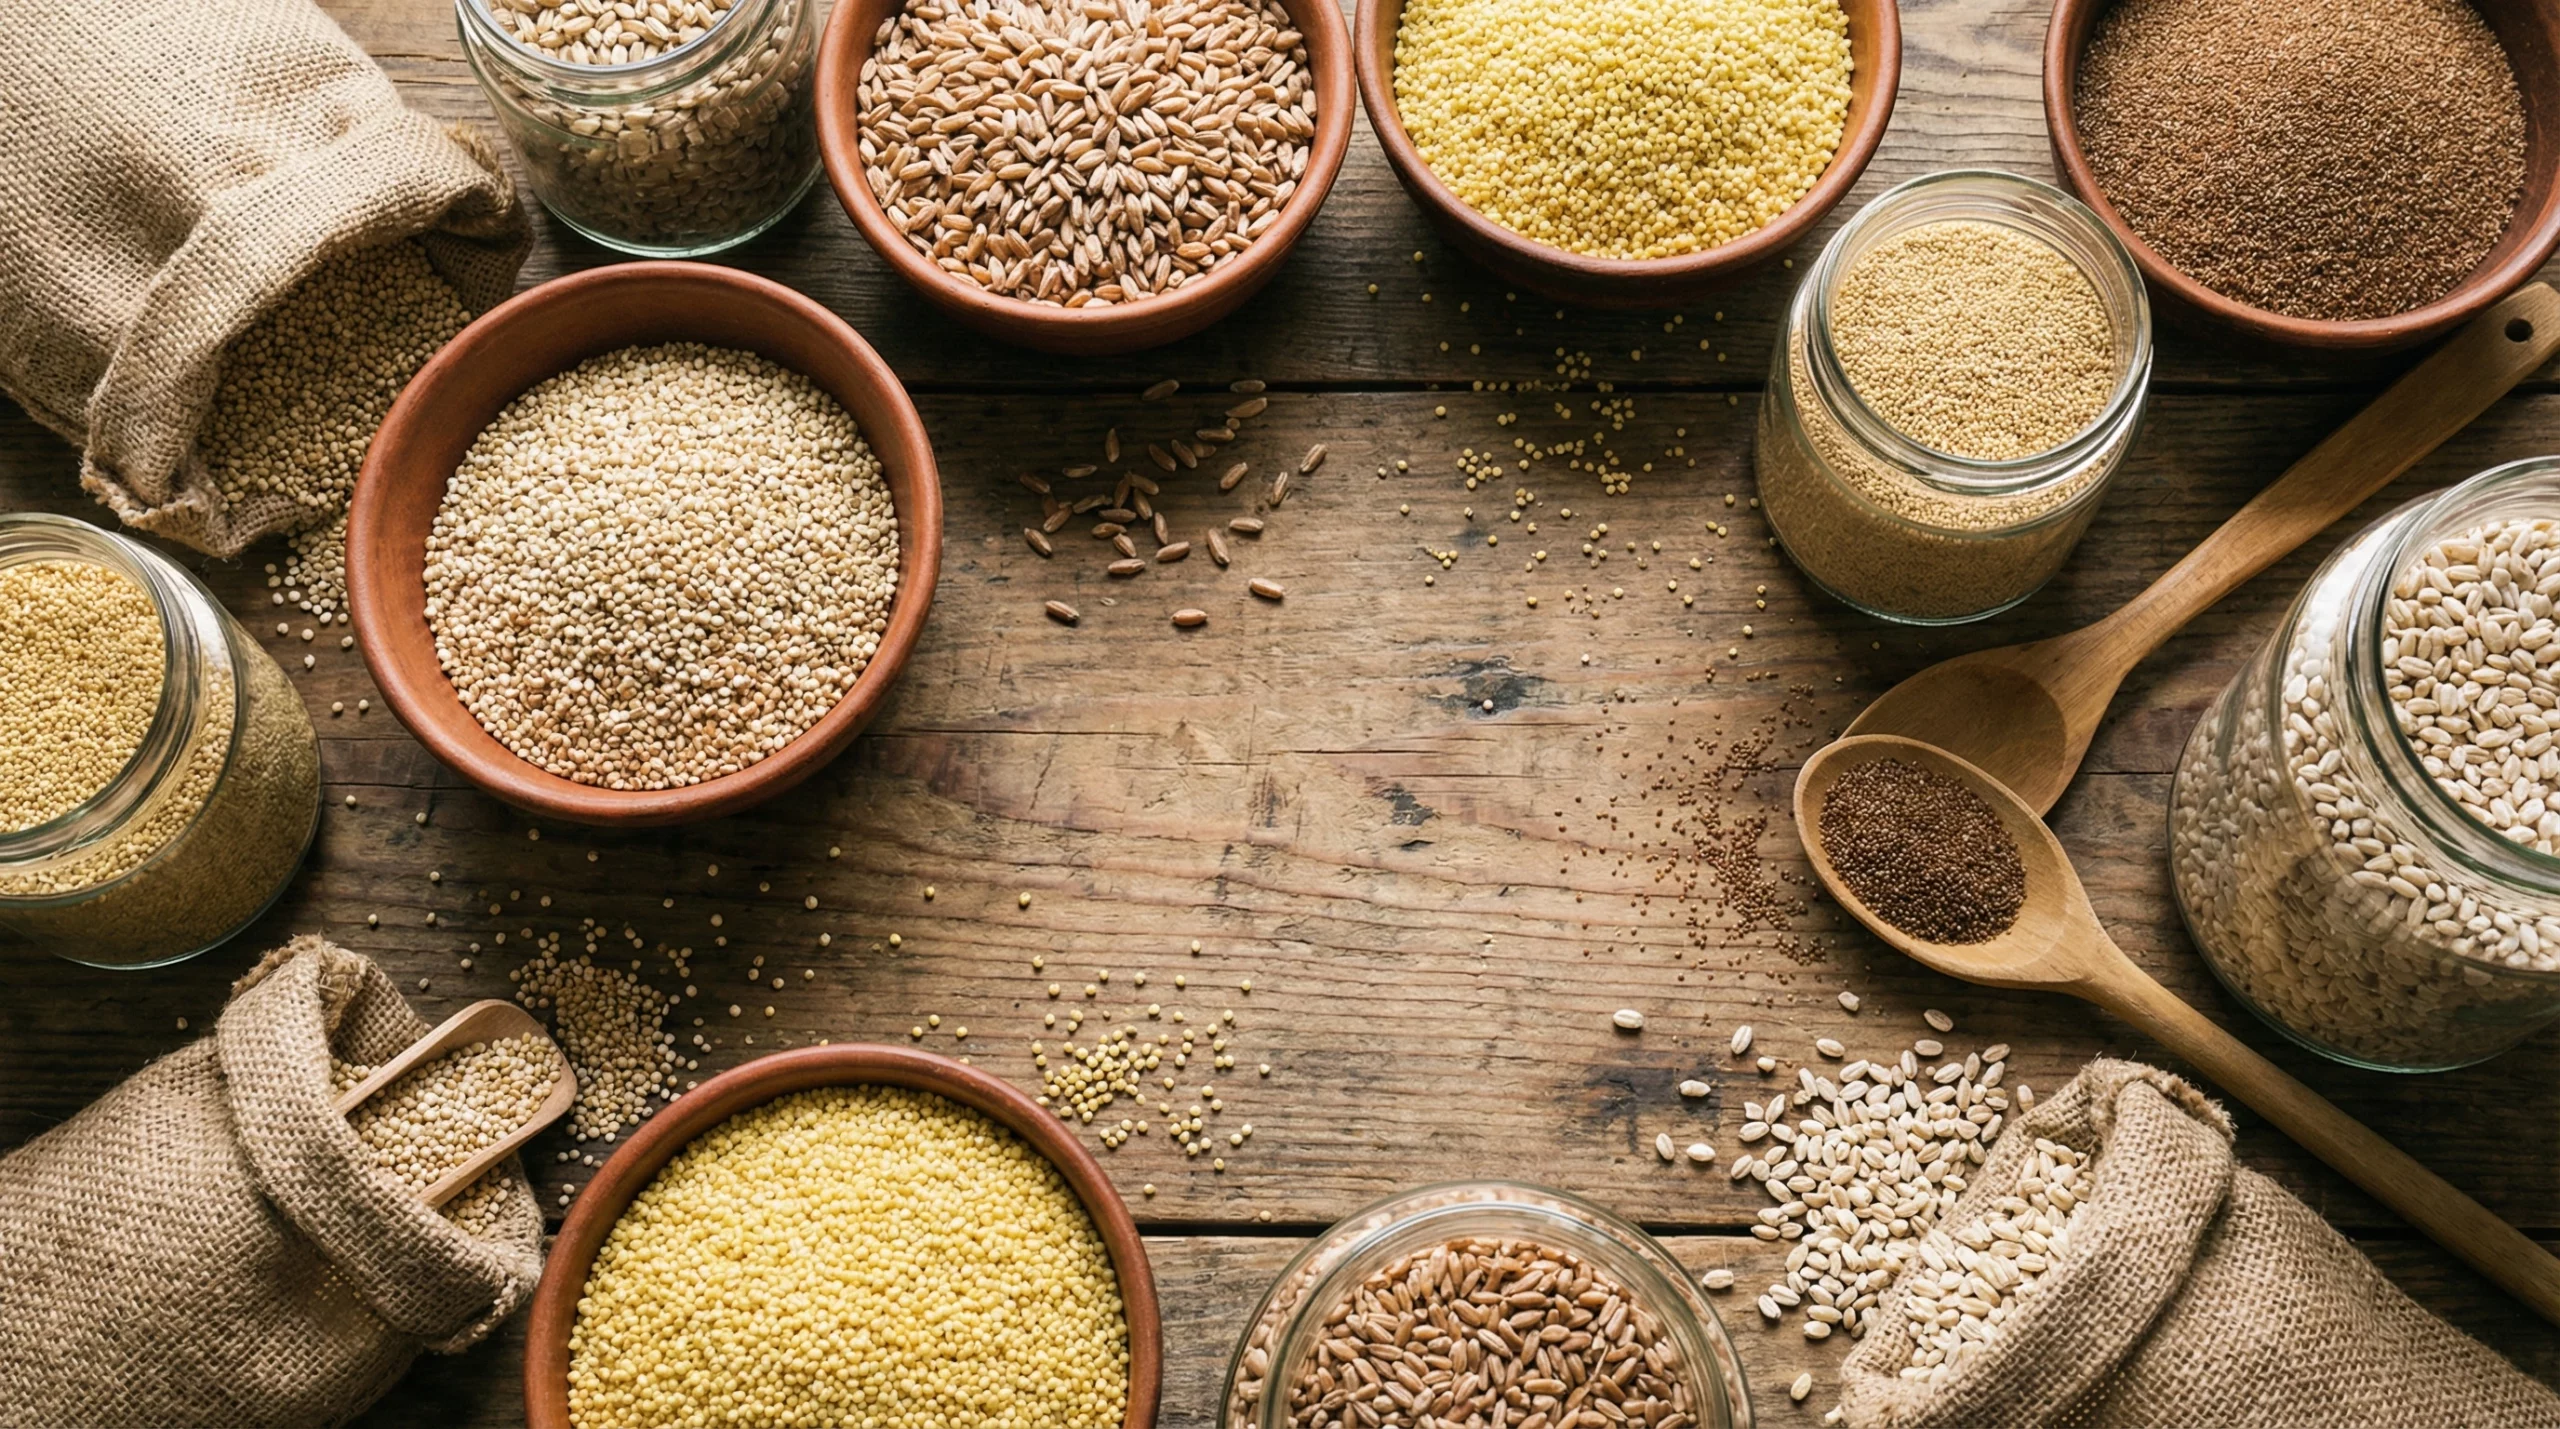
Examples of ancient grains you’ll see most often include quinoa, farro, millet, amaranth, teff, einkorn, spelt, freekeh, and sorghum. Each has its own personality—flavor, cook time, and best uses—so there’s something for every style of meal or diet. These grains hold onto their wild, original qualities, which can make cooking more exciting and adventurous.
Why Cook With Ancient Grains?
Ancient grains are often a smart switch for regular rice, pasta, or plain white bread. They pack in more nutrition, including fiber, vitamins, minerals, and protein, so you get a health boost with your meals. The whole grain texture isn’t just for health food fans; these grains have genuinely satisfying flavor and often add a little chew or pop, which makes food more interesting.
Whole grains like quinoa and farro are sometimes gluten-free, too (quinoa, millet, amaranth, and teff are all naturally gluten-free). Just be sure to double-check your labels if you need to avoid gluten for health reasons, as some grains are processed on shared equipment in factories. This makes ancient grains an easy way to add options for everyone at the table, even if you have different dietary needs.
Picking the Best Ancient Grains to Start With
If you’re totally new, I recommend starting with quinoa, farro, and millet. These are easy to find, they cook up pretty quickly, and they work in all kinds of different meals—from breakfast to dinner. Here’s a quick breakdown:
- Quinoa: Cooks in about 15-20 minutes. Light and fluffy with a slightly nutty taste.
- Farro: Chewy and hearty, works well in soups, salads, or side dishes. Takes a bit longer to cook, usually 25-40 minutes depending on the type.
- Millet: Mild flavor, cooks in 20 minutes or so, and goes well in both savory and sweet dishes.
Once you get comfortable, you can branch out into grains like amaranth (a bit sticky and great for porridges), teff (tiny and perfect for Ethiopian-inspired injera bread), or spelt and einkorn (good for baking). You might even check out barley and freekeh for heartier stews and pilafs. The more you experiment, the more you’ll stumble upon new favorites to enjoy.
Getting Started: Basic Tips for Cooking Ancient Grains
Cooking ancient grains isn’t much tougher than making pasta or rice. Here are some reliable tips that can really give your meals a boost:
- Rinse First: Most grains benefit from a quick rinse in a fine mesh strainer. This removes dust and, in the case of quinoa, a coating called saponin that can taste bitter.
- Water Ratio Matters: Using the right amount of water is really important. Some grains soak up a lot, while others need draining, just like pasta.
- Season as You Go: Cooking grains with a bit of salt or in broth gives them much better flavor. You can always add herbs, garlic, or even a bay leaf for a more exciting taste.
- Rest After Cooking: Once grains are done, let them sit off the heat for 5-10 minutes with the lid on. This helps them finish steaming and turn out fluffy instead of mushy.
Even if you mess up once or twice, don’t get discouraged. Every attempt helps you learn more about timing and texture, so you’ll get the hang of it faster than you think.
How to Cook These Top Ancient Grains
- Quinoa: Use 2 parts water to 1 part quinoa. Bring to a boil, lower the heat to a simmer, cover, and cook for 15-20 minutes until the water is absorbed. Fluff with a fork.
- Farro: For pearled farro, go with 2.5 parts water to 1 part farro. Simmer 20-30 minutes until tender but still chewy, then drain any extra water. For whole farro, soak overnight for a shorter cook time and even texture.
- Millet: Toast the millet in a dry pan first for a nuttier flavor if you want, then use 2.5 parts water to 1 part millet. Simmer, covered, for about 20 minutes.
Other grains follow similar methods. Teff needs about 4 parts water for 1 part grain and cooks quickly, around 15 minutes. Amaranth can get sticky, almost like porridge, so it’s best in breakfast bowls or formed into patties.
Working Ancient Grains Into Everyday Meals
After cooking, ancient grains are super flexible and can fit into almost any meal. Here’s how I like to use them most days:
- Salads: Toss cooled quinoa or farro with veggies, fresh herbs, and a tangy vinaigrette. You can even add some grilled chicken or roasted chickpeas for extra protein.
- Bowls: Layer grains as a base with protein (beans, tofu, chicken), greens, and any extras you like. Think of it as a fancier grain bowl that holds whatever leftovers you’ve got lying around.
- Breakfast: Millet or amaranth works well as a porridge cooked with milk or a plant-based alternative, then topped with fruit and nuts. Try adding cinnamon or a little honey for a warm and comfy morning meal.
- Soups & Stews: Farro, spelt, or barley add body and nutrition when simmered in a hearty vegetable soup. Add them at the start of cooking so they soak up all the flavors.
- Baking: Some ancient grains, like spelt and einkorn, can replace regular wheat flour in pancakes, muffins, or bread for a fun twist and extra nutrition. You might need to experiment with ratios and sometimes add a bit more liquid to the recipes.
Experimenting with new recipes is a smart way to get the whole family or your friends excited about trying something a bit outside the ordinary, and it can be a fun chance to cook together.
Common Problems (And How to Fix Them)
I hit a few snags when I first started, so here are typical issues and how to clear them up fast:
- Grains Too Mushy: Too much water or overcooking is usually the reason. Check doneness early and keep the lid off for the last minute of cooking if you see extra liquid, letting steam escape to dry things out.
- Grains Too Chewy: Undercooked grains happen sometimes, especially with farro or barley. Pop the lid back on and simmer a bit longer, adding a splash more water if needed, until you get the texture you like.
- Bland Flavor: Salt, spices, or cooking the grains in broth makes a huge difference. Don’t be afraid to taste as you go and adjust the flavors with fresh herbs, citrus, or a quick drizzle of olive oil.
If your grains come out somewhere in between perfect and not-so-great, reuse them in another dish—think casseroles, soups, or even stir fries. The textures are usually forgiving, and you cut down on food waste, too.
Storing and Reheating Ancient Grains
Cooked ancient grains store well in the fridge for up to five days. I usually keep some on hand for tossing into salads or lunch bowls through the week. Reheat them with a splash of water or broth to keep them from drying out, either on the stove or in the microwave. For longer-term storage, most grains can be frozen; just portion them into freezer bags or containers and thaw overnight in the fridge for a quick meal starter.
Buying Ancient Grains: What to Know
Buying high-quality grains is easier now than ever; good brands are popping up in regular supermarkets, health food stores, and online. Look for whole, unprocessed grains when possible. You’ll sometimes spot “pearled” versions of farro or barley, which cook faster but are a bit less nutritious, so check labels if that matters to you. I pay attention to the source too, as grains grown locally or organically can taste fresher and have fewer pesticides. For further info, you can check out the Whole Grains Council (Whole Grains Council Ancient Grains Guide).
Sometimes, bulk bins can offer a better price, and you can buy only what you need to try a new recipe. Just make sure the bins look clean and that your grains aren’t dusty or full of debris. If you’re shopping online, check customer reviews or look for seals of quality to make sure you’re getting what you expect.
Beyond the Basics: Fun Ways to Experiment
Once you’re comfortable cooking them plain, ancient grains open up many opportunities for experimenting:
- Try Popping Sorghum or Amaranth: These act kind of like mini popcorn and are actually pretty good as a snack or sprinkled on salads for a little crunch. You only need a hot, dry pan and a lid; the grains will pop in just a minute or two.
- Add Into Burgers or Veggie Patties: Cooked grains help bind patties together and make them heartier. Try mixing cooked millet or quinoa into black bean burgers or even turkey patties for extra nutrition and texture.
- Make Pilafs or Stir Fries: Sauté grains with veggies, spices, and maybe nuts or dried fruit for extra flavor power. Use leftover cooked grains for a fast dinner, adding in whatever odds and ends you find in your fridge.
- Bake with Ancient Grain Flour: Grind your own or buy flour made from ancient grains to add to cookies, crackers, or bread for a unique flavor. Spelt and einkorn work especially well, and they can even take regular recipes up a notch.
Playing around in the kitchen is probably the most helpful thing you can do. I mess up sometimes, but almost every cooking “fail” turns into inspiration for the next meal. Ask family or friends for new ways to serve ancient grains, or challenge yourself to try a new type each month.
Frequently Asked Questions
I hear a lot of the same questions about ancient grains when talking to other home cooks and friends, so here are the answers for anyone curious:
Q: Are ancient grains healthy?
A: Most ancient grains are rich in fiber, vitamins, minerals, and sometimes protein. They work well for plant-based and whole food diets, but you still want to stick to balanced portions if you’re watching carbs or calories. Ancient grains are an easy way to get extra nutrients and break out of a boring meal routine.
Q: Can I use a rice cooker or Instant Pot?
A: Rice cookers or multicookers like the Instant Pot work well for grains like quinoa and millet. Just check water ratios and recommended settings in your device manual or online; some grains need more water or time than others. Multicookers, especially, can take a lot of the guesswork out, which is great if you’re just starting out.
Q: Which ancient grains are gluten-freelow-pressure?
A: Quinoa, millet, amaranth, teff, and sorghum are naturally gluten-free. Always check packaging for possible cross-contamination if you need strict gluten-free food. Depending on your needs, you can find certified gluten-free versions in many stores.
Q: How should I store dried ancient grains?
A: Store grains in airtight containers in a cool, dry place like a pantry. They’ll last for months, sometimes years, if kept dry and away from pests. For an even longer shelf life, store grains in the freezer, especially if you buy in bulk.
Final Thoughts on Ancient Grains for Beginners
Cooking with ancient grains is a low-pressure way to add something new and nourishing to your meals. I find it makes home-cooked food a bit more interesting, and even picky eaters can usually find a grain they enjoy. Give one or two a try, don’t worry about getting every step perfect, and see which new flavors and textures you end up liking best. You’ll probably stumble upon something you want to keep around in your kitchen all the time, and before you know it, ancient grains will be a regular part of your kitchen adventure.


Hello Dan!
This was such a good read because ancient grains always sound fancy, but I’m over here like… okay, what do I actually do with them once I buy the bag? I loved how you broke it down in a way that didn’t feel preachy or complicated. It honestly made me feel like, yeah, I could throw one of these into dinner without totally messing it up or having my family side-eye the meal.
Real talk though — which one would you say is the most forgiving for a first timer? Like, the one that won’t turn into a weird mush if you look away for two minutes? And do you usually swap these into meals you already make, or do you build new recipes around them? This definitely made ancient grains feel less “health food store intimidating” and more everyday doable.
Angela M 🙂
This is a most interesting article on cooking with ancient grains. Thanks for covering the whole process of selection, preparation, and the actual cooking. Getting extra nutrients from these grains is especially important given the current standard of farming practices. Although my wife currently cooks some of these grains, you have provided additional information that we were not aware of. I am saving this article for future reference and to share with others.